7 Powerful yoga poses to burn that stubborn belly fat fast
How to reduce belly fat fast? Is there any way that can help to get rid
of stubborn belly fat? Yes! Yoga!!
These powerful yoga poses will help you to reduce belly fat fast
(obviously not within a week, but faster than other weight loss
workouts).
But apart from yoga, you have to maintain healthy diet too. Doing yoga
with unhealthy junk food and harmful additives cannot help you out much in
weight loss.
So, try to stick to your yoga routine, as it will not only reduce your
belly fat but will give you glowing skin and attractive personality
too.
Have a look at your yoga workout to reduce belly fat fast and get flat
sexy tummy.
1. Plank (Kumbhakasana)
Thanks to this pose you will exercise the whole body in a very simple
way. Doing plank you will work your thighs, buttocks, shoulders, back and
belly area.
Step 1: Start in a similar posture to the one you take when you are going
to perform push-ups, place your hands vertically aligned with your
shoulders and make sure to keep your back straight.
Step 2: Stay in this position making sure to exercise and tense your
abdominal muscles.
Stay in this position for 15-30 seconds. Repeat this exercise 5 times,
resting 15 seconds between each exercise.
2. Wind Relieving Pose (Pawanmuktasana)
This posture of wind release is a great exercise to soothe lower back
pain as well as to strengthen abdominal, hips and thighs.
Step 1: Lie on your back with your legs straight, heels touching each
other and arms stretched alongside your body.
Step 2: Exhale as you bend your knees and bring them up to your
chest.
Step 3: Keep your knees as close to your body as you can. Use your
abdominal muscles to hold the position.
Step 4: Stay in this position for 60-90 seconds while breathing deeply
and slowly.
Step 5: Exhale as you return your knees to the starting position to
finish the exercise.
Repeat this position for 5 times, rest for 15 seconds between each
exercise.
3. Boat pose (Naukasana)
This posture focuses on the back, legs and belly.
Step 1: Start by lying on your back with your legs straight and your arms
close to your body.
Step 2: Inhale as you lift your legs up making sure they remain straight
and fully stretched.
Step 3: Form a 45 degree angle with your body lifting your torso off the
ground using your arms for balance.
Step 4: Hold the position for 15 seconds. Return to the starting position
and let the body rest for another 15 seconds. Repeat 5 times.
4. Bow Pose (Dhanurasana)
Step 1: Lie on your stomach with your legs straight and your arms close
to your body.
Step 2: Bring your feet back while raising your arms straight up to
support your ankles.
Step 3: Hold the position for 15-30 seconds.
Step 4: Exhale and return to the starting position allowing your body to
rest for 15 seconds.
5. Cobra pose (Bhujang asana)
Cobra pose strengthens your belly and back. This posture is not
recommended for people who have suffered a back injury or for pregnant
women.
Step 1: Start by lying on your stomach with your legs straight and your
arms bent alongside your body so that your hands are under your
shoulders.
Step 2: Keeping your legs flat on the floor, lift your head with the help
of your arms. Breathe deeply as you bring your chest further and further
back.
Step 3: Hold the position for 15-30 seconds and exhale slowly as you
return to the starting position.
Repeat 5 times, resting 15 seconds between each pose.
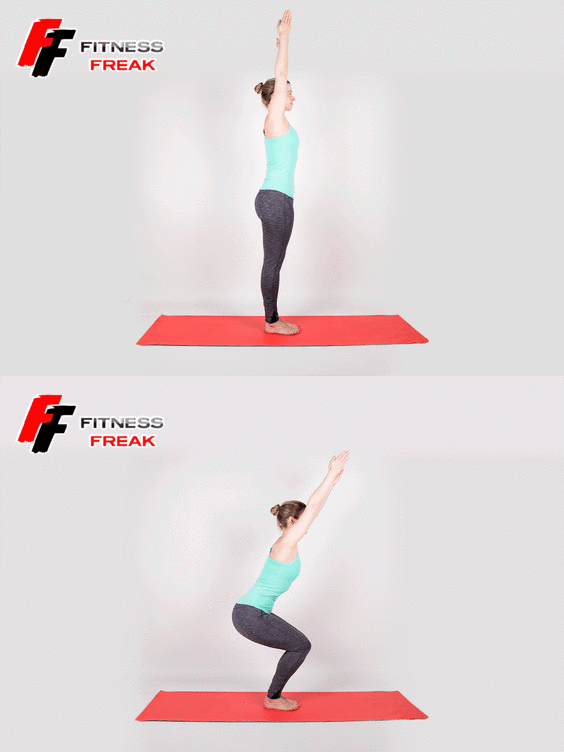
6. Chair Pose (Uthkatasana)
This exercise will strengthen the back, abdomen, buttocks and legs. It is
not recommended for those who suffer from a back or knee injury.
Step 1: Stand with your hands in Namaste position in front of you.
Step 2: Bend your knees as if you were going to sit in a chair.
Step 3: Bring your hands above your head while stretching your
arms.
Step 4: Keeping your back straight, use the weight of your torso to help
you find your balance as you bend your knees more and more.
Step 5: Hold the position for as long as you can while breathing
normally.
7. Bridge Pose (Setubandhasana)
Step 1: Begin by lying on your back with your legs straight and your arms
close to your body.
Step 2: Bend your knees while bringing the soles of your feet towards
your hands. Then lift your body so that your back and buttocks are no
longer touching the floor. Make sure that both your neck and the soles of
your feet are in contact with the floor.
Step 3: Use your arms as additional support to hold the position
correctly.
Step 4: Hold the posture for as long as possible.
Now you have no excuse to do these poses and tone your body. Share it
with all your friends and family!


